Thursday, December 28, 2017

Christmas Projects finished!

Good afternoon! I hope you've had a lovely Christmas season thus far!  I haven't posted in awhile and the pics I am including here below show why...I make most of our Christmas gifts for our family in the form of quilted items and baked goods.  The "Joy" item is a tablerunner and/or a banner that I found a free pattern for online.  Very easy and I love the way it turned out!
I also made a tablerunner set with matching placemats in a stripe. And below is a small table topper that was fun to do using simple half-square triangle sets. You can arrange them in a million different ways for variety!


 The black, gray, white items are a tablerunner with matching place mats that a friend wanted for her daughters to give her for Christmas.
 And these are log cabin coasters or mug rugs (unfinished in this pic) 
I haven't done any log cabins in ages and really enjoyed working with them again. They also make really cute tablerunners. These were made from 1 1/4" strips - very small! But if you cut 2" strips or larger you can make a project that will go together much quicker!
 Buckeyes are a perennial Christmas favorite at our house. They take a lot of time, but it's so worth it! It just doesn't get any better than peanut butter & chocolate! (as you can see below, I had to "test" one...it's the least I can do for my family to make sure they only get the best!....)  ;)
 And this is the sampling of nearly every Christmas cookie or candy I made this year - ready to go on the table for part of our dessert. I made the easy Eaglebrand Milk fudge, snickerdoodles, 7 layer bar cookies, and 2 types of chocolate bark. One with white chocolate on top of dark, and pistachios and craisins stirred in, the other with broken candy canes. Easy, easy, stuff and it all freezes well!  So I don't have to make it all at the last minute...a huge plus!
 I also make cinnamon rolls for gifts for everyone's family, but did not get a pic of those this year.

Below is a mug rug I made several of to give as small gifts.  I also made some with snowmen - but somehow didn't get pics of those, either...one can only do so much, right?
The Key is to enjoy the Holidays and not get crazy over what doesn't get done. I do hope that you were also able not to stress over it all!

Christmas quote: "Christmas is the spirit of giving - and may it last all the year through!" ~me 

Friday, December 1, 2017

Christmas wall-hanging

Good morning!  It's December 1st already - are you going crazy yet??  I'm not quite there, but I'm certain it's just around the corner.  I can begin projects and list-making and shopping (mostly online) weeks and even months before Christmas and yet I'm always looking for last-minute projects to finish! I must be addicted to the rush of the deadline....or something...

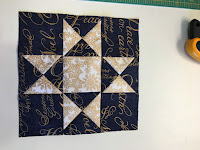
 I designed this star block wall-hanging from adding to an Ohio Star and wanted to share it with you - it makes a lovely block for a wall-hanging or table runner. (It probably has been around for decades, but I was just playing with fabric and didn't follow a certain pattern and this is what popped out!...well....not exactly "popped"...you'll see how in the pics & tutorial. Hopefully, I can remember what exactly I did...) :))
Finished size: 16" square

Here we go: Cut 2- 3 1/4" squares of a light fabric and cut corner to corner to make 4 triangles. These will be the points of the Ohio Star portion of this star block.
 Cut 2- 3 1/4" squares of a contrasting fabric  and sew together into the sets to the right..
Now sew 2 of these sets to each other, making the quarter-square triangle sets. You will have 4. They should be 2 1/2" squares. Set aside for later..

Cut 4 - 2 1/2" squares of your darker contrasting fabric and one light 2 1/2" square for the center of the star.
 Sew together in rows to make the Ohio Star block below.
   
Ohio Star
Next, cut 4 - 2 1/2" squares of the light fabric. Draw a line from one corner to another.  Cut 4 - 6 1/2" squares of the dark fabric. Place light square over one side of the dark and sew on that line, corner to corner. Do the same for the other side as below.  Make 4 of these units.
   Now sew 2 of these units to the

Ohio Star block top and bottom as below. Then sew 2 dark 2 1/2" squares to the ends of the other 2 units and add on the sides.


Next cut 8 - 1 1/2" x 10 1/2" strips of the dark fabric and 4- 1 1/4" x 10 1/2" strips of the light and sew together as below.  Add the side strips first. Cut 4- 3 1/8" squares for the corners and add to top & bottom strips and sew on last.  Bind and add tabs to hang on dowel rod - or you can sew on a sleeve on back for the rod to slip through.


   And there you have it! Hope you have fun creating your own stars!

Quote of the day: Christmas is not so much about opening presents as about opening our hearts.

Wednesday, November 22, 2017

Cinnamon Bundt Cake Recipe


 T'was the day before Thanksgiving and all through the house,
there are aromas of food that would hurry a mouse!
The turkey was thawing in the fridge with cold air
In hopes that the family would soon be all there.

The children weren't snuggled all warm in their beds -
They left home years ago to follow their heads (?)
And mama in her apron, and I in my Blues cap
Are looking real forward to a long afternoon nap!

(my weak attempt at a poem based on T'was the Night Before Christmas...sad, I know..)

...and if you're like me, you're busier than a honey bee in a clover field!  But it's a fun kind of busy.  This will just be a quick post, but I wanted to share this delicious, moist cake recipe with you that's been in our family for decades.  My Aunt Ruby made this and I was crazy over it, so I asked for the recipe and have been making it for my husband's birthday ever since!

One thing I love about it is that it's fast, easy and you really can't mess it up!  Plus, it feeds a crowd! So what's not to like?

A short story...when our first child was a baby, I was making this & he needed tending to - I forgot about the cake for a full 30 minutes after it should have been removed from the oven!  But guess what?  It was still moist and delicious - you would never have known I over-baked it!


Ok, here you go...

Cinnamon Bundt Cake (with orange glaze)

1 pkg yellow cake mix                                            1/2 cup sugar
2 small pkgs INSTANT vanilla pudding                 2 teaspoons cinnamon
3/4 cup oil                                                                1/2 cup chopped pecans
3/4 cup water
4 eggs

Preheat oven to 350 degrees.
Mix all ingredients together in mixing bowl and beat for a good 5 minutes on med-high speed. While that's beating, mix in a small bowl the sugar, cinnamon and nuts.
Pour 1/3 of batter in greased & floured bundt pan, then 1/2 of the nut/sugar mixture, the repeat, ending with batter.
Bake at 350 for approx 55 minutes - I always check at about 45, but it usually takes a full 50 minutes or so.

Let cool.  Glaze with 1 cup powdered sugar mixed with 1 1/2 tablespoons orange juice or enough to make a good drizzle consistency.

Quote of the day: "
Thanksgiving, after all, is an action."
and..."It isn't so much what's on the table that matters as who's on the chairs." ;)

 Happy Thanksgiving to each and every one of you!

Sunday, November 19, 2017

Thanksgiving Tips and Fresh cranberry sauce recipe!

Thanksgiving is just days away and I don't know about you - but I can always use a few tips to make the gathering and meal more enjoyable.

Image result for turkeyTurkey Time

So here are a few:

Do as much prep ahead of time as possible...duh, I know...but here are some examples.

1) Do any deep cleaning several days ahead, people won't be looking at baseboards or behind furniture anyway..
2) Clean oven!  That burnt food on the bottom of your oven will affect the flavor of whatever you are baking
3) Bake turkey the day before the meal, carve and pour juices over, then seal tightly and reheat on Thanksgiving at 325 for 45 minutes or an hour, but test after 1/2 hour...you don't want it to dry out!
4) Peel and slice potatoes the day before and put in pan of water in fridge.
5) Make cranberry sauce the day before-fresh is best and very easy! Recipe below..
6) Pies can be baked the day before as well, or even the week before and frozen
Image result for pies

and 7) Take the phone off the hook after lunch and rest for an hour before everyone comes over! I highly recommend this - it helps revive me and can enjoy the evening so much better if I am rested and NOT stressed!

Last, but not least...if everything is not perfect, don't worry - your guests will enjoy the meal and their evening together if they sense that you are, too.  Remember: There is no perfection this side of eternity - but there can be a lot of fun if you maintain a sense of humor!

That's all I can think of for now...here's your fresh cranberry sauce recipe:

Cranberry Sauce

12 oz fresh cranberries
1 cup sugar
1 cup orange juice
pinch of cinnamon

In a medium saucepan, dissolve sugar in orange juice.  Stir in the cranberries and cook until the cranberries start to pop (about 10 min). Remove from heat, sprinkle on cinnamon & place in a bowl. It will thicken as it cools. Enjoy!

Quote of the day: Smile! It's contagious! 
Happy Thanksgiving!

Saturday, November 18, 2017

Zippered Pouch..so easy, great gift idea!

Good Saturday morning!

I am so very excited about this project!  I watched the Missouri Star Tutorial on YouTube "The Zippered Pouch: An Easy Quilting Project Tutorial" and though I've made zippered pouches and clutch purses before, this is by far the best tutorial and method I've ever seen or done!  So I am just going to take you through a mostly picture tutorial of my own project, but refer you to the Missouri Star video tutorial for a more in-depth lesson.

Once you learn this method for sewing zippers in bags the possibilities are endless!
 

For a pouch 7"x 7 1/2" I began with the lining fabric & cut a 17 x 8 1/2" rectangle. I then cut a piece of fusible fleece to match and fused them by ironing them according to the fleece directions...the bumpy side of the fleece to the WRONG side of the fabric.  For the front of the pouch I cut once piece of fabric 17 x 6 1/2' and another strip for contrast at the top of the pouch 17 x 2 1/2" and sewed them, Right Sides Together right onto the fleece.

After topstitching next to that seam on the Right side, I cut the piece in half which will become the front and back. Make sure both pieces are EXACTLY the same size!

Now we'll prepare the zipper. Choose one that's nylon and is longer than the width of the pouch. Mine was 9".  You'll cut off the end of the zipper and prepare tabs to cover both ends of the zipper by cutting a strip 5" long by 1 1/2" wide. It should match the top fabric of your bag.  Fold in half, then fold both long ends in toward center, then fold in half & press.
 

Stitch with zipper ends inside the fold - be sure to catch both sides. Cut off excess.  Now sew zipper, RIGHT SIDES TOGETHER against top of pouch front. Be SURE to leave 1/2" from both ends - the zipper will be centered against the top with 1/2" left on each end. See photo. Sew about 1/4" from upper edge.  Open and top stitch next to zipper on Right Side.
Now you will sew the other side of the zipper to the RIGHT SIDE of the other piece's TOP edge of the pouch.

Almost done!
Now...VERY IMPORTANT! LEAVE ZIPPER OPEN!!!!  Sew front to back - be sure to line them up and make sure to match up the bottom & sides.  Sew together sides & bottom.  (I squared up the bottom of the pouch...I will show that technique on a future tutorial, but in the meantime you can find some on YouTube, most likely.  Pull through the open zipper, and.....


Voila!
Quote of the day:  "Sewing is not just a craft...it's therapy!" Amen!

Cinnamon Bundt Cake Recipe

     T'was the day before Thanksgiving and all through the house, there are aromas of food that would hurry a mouse! The turkey wa...